Instructions to Draw An Air pocket Letter P
The letter P is the sixteenth letter of the letter set. It is a moderately interesting letter, however one that a great many people can undoubtedly figure out how to compose. It keeps up with its shape whether it’s capitalized or lowercase, however the lowercase rendition goes further inside and out, making it significantly simpler to learn. Typically, composing this letter is especially easy, yet could you begin transforming it into additional innovative shapes and structures? After reading this blog and visit the pinkie pie drawing.
In this guide we will let you know how to figure out how to draw the air pocket letter P in only 6 simple and tomfoolery steps. Likewise, later we will likewise see a few fun plans to make it much more extraordinary! Have your #1 drawing devices and painting media prepared on the grounds that we’re simply getting everything rolling with the most vital phase in drawing an extraordinary variant of this letter.
Instructions to Draw An Air pocket Letter P
Stage 1
While drawing this kind of air pocket lettering, we frequently utilize a pencil first to design it out. Nobody will at any point see this timetable and can make the structure more exact. All you would need to do is attract a P your favored composing style. This would likewise be an effective method for arranging how enormous it will look on the page.
You can attempt to draw it without this aide, yet it very well may be an incredible method for making it more straightforward. It ultimately depends on you, yet one way or the other we’re all set! The letter P has a columnar back on the left side. That is where we start, with a bended vertical line. The reference picture we gave shows you how it ought to bend in anticipation of the following couple of lines. Assuming that you are content with the look, we can continue on toward stage 2 of the aide!
Stage 2
Stage 2 will be extremely straightforward and we will finish the line that you attracted the past step. In this step we drew the side of the segment to one side of the letter. In this second stage we will draw the foundation of this segment. Proceed the last known point of interest, bending inwards and afterward upwards.
The reference picture shows you how it ought to look and you can attract it gradually to ensure it’s smooth. In the event that you can consolidate the lines from stages 1 and 2 into one stroke, it will be smoother. At the point when this piece of the section is prepared we continue on toward stage 3 of the guidelines where we finish the external layout of the letter.
Stage 3
There is currently an enormous void space on the right half of the air pocket letter P, which we will fill in this step. As you can find in the reference picture, this is finished with a solitary bended line. This is quite possibly of the longest queue in this drawing, so it very well may be somewhat precarious on the off chance that you’re in a rush. You can decide to begin at the top or lower part of the excess void space.
Whenever you’ve chosen where to begin, attempt to keep your hand as still as conceivable while adding the adjusted line we show in the reference picture. Attempt to make it as round as workable for an air pocket like impact. At the point when it’s drawn, you’re finished with the external blueprint! In the event that you attracted a pencil manual for help, it would be smart to eradicate it now as you won’t require it and it would make drawing the inside subtleties more troublesome.
Stage 4
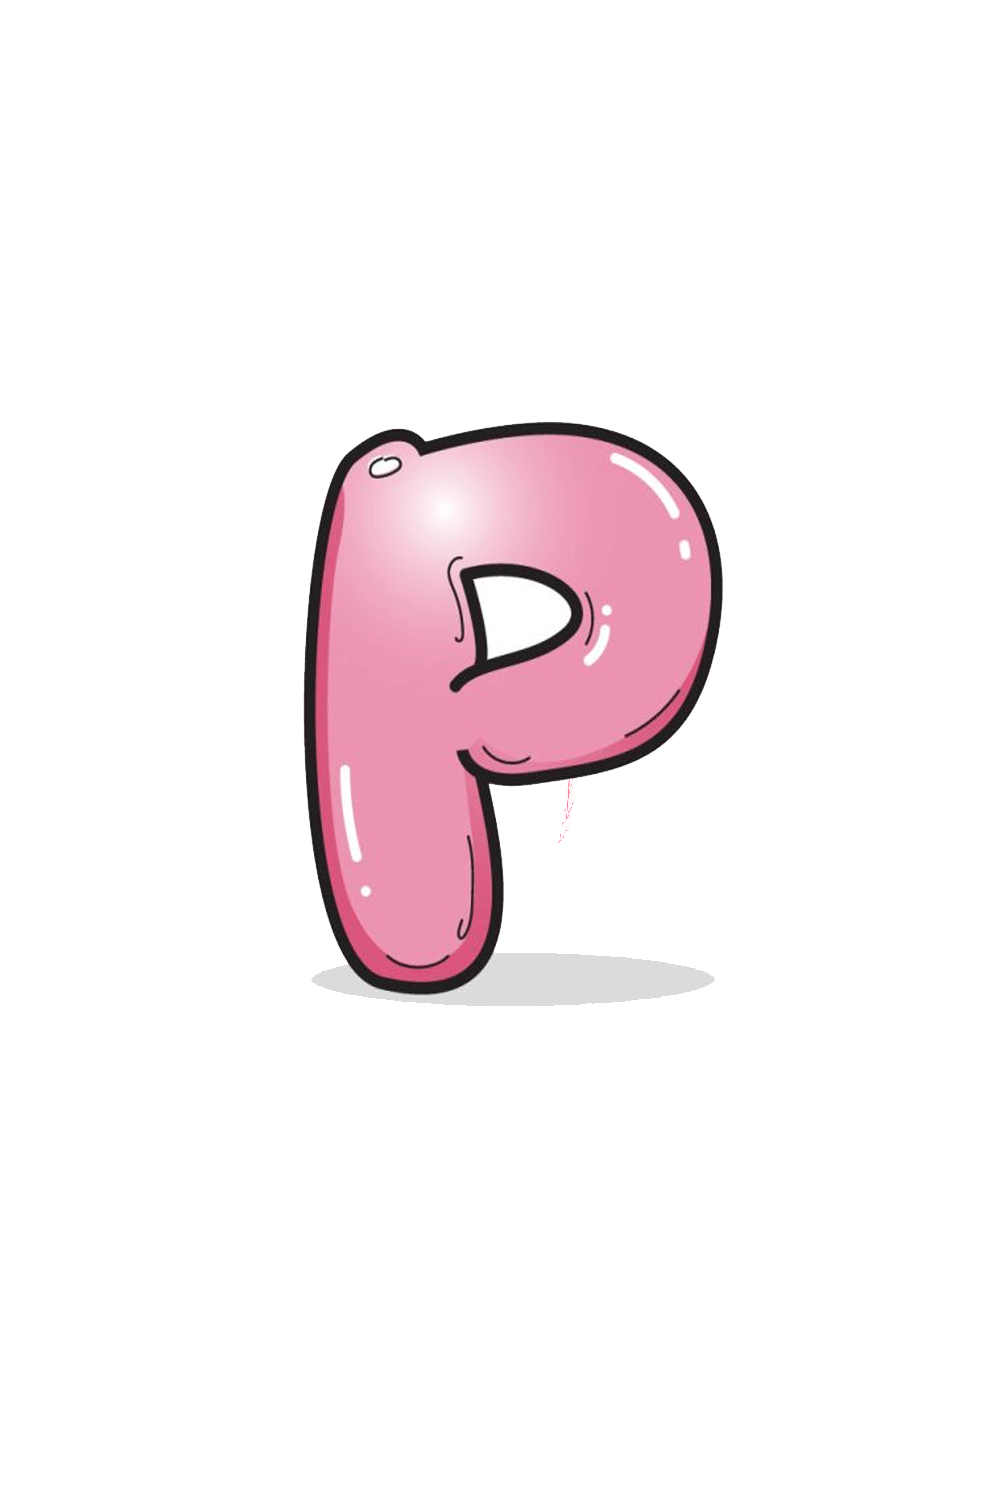
Now that the framework of the letter P is drawn, how about we draw the inward layout. For an ordinary letter P, this inward part is generally more round, however we’ll adopt an alternate strategy. We want to make this P seem as though it’s made from an air pocket. So we will shape the opening in the middle to more readily match that look. Rather than an adjusted shape, it will seem to be the letter D. The reference picture shows what it ought to resemble.
You’ll likewise find in the reference that the base left line of the letter covers a little. This is to cause it to show up as though the inflatable material it would be made of is collecting on itself. With this brought into the letter, the subsequent stage is to prepare us for the last little details.
Stage 5
In this piece of our aide, we’ll investigate the schematic you’ve finished by adding a few interior subtleties. The letter as of now seems to be an air pocket, however these subtleties will assist with making it look significantly more. To start with, we should add a little detail to make it look considerably more like an inflatable. This will be looking like a little oval.
We decided to put it in the upper left corner of the letter, however you can put it elsewhere in the letter. This little oval gives the feeling that light is glistening off the outer layer of the letter, causing it to seem somewhat less level on the page. Then, we should add a few lines along the inward shapes of the letter P. This makes the letter look even not so much level but rather more like an adjusted item with profundity.
You can recreate it as in our reference picture, however go ahead and add these lines somewhere else. Prior to continuing, make certain to add some other subtleties you could like! These can be embedded into the bigger one as examples or little shapes inside the diagrams. Or on the other hand you could draw a foundation and perhaps add a few additional letters close to it! Anything you choose, we can continue on toward the last stage when you’re finished.
Stage 6
Presently it is the ideal time to polish off your drawing with some tone! This is a stage that offers you a great deal of slack and imagination. For the present, how about we stay with the variety plot we decided for our model. We picked pink since it begins with P! The varieties are haziest at the lower part of the letter and ease up close to the imprint we drew before. Fluctuating the shades can assist with making this letter seem as though it’s made from an air pocket or inflatable.
Pink would be an incredible variety for this letter, yet you can utilize any variety you like! You could likewise stay with the P subject and utilize purple all things considered, however any varieties you like would be perfect. You may likewise track down ways of involving more than one variety in the plan, for example, adding an example exactly. One more method for making wonderful variety varieties is utilize some pleasant workmanship devices and mediums and some art supplies. With that, your drawing is finished! Before we finish, we should go north of a couple of additional thoughts on how we can make this drawing far better.
Your Air pocket Letter P Drawing is Done!
Also Read trade durian